Previous Story
Camping Equipment for the Road
Posted On 27 Mar 2023
Comment: 0
Tag: Long-distance motorcycle travel, Double-Take Adventure mirrors, Motorcycle handguards, Adventure motorcycle accessories, Motorcycle weight distribution, Road trip packing list, Motorcycle tool storage, Motorcycle fuel storage, REI Groundbreaker II tent, Compact camping gear, Motorcycle camping tips, Nelson-Rigg Hurricane, Turkana Gear, Motorcycle camping setup, Motorcycle road trip, Tiger 800XCa setup, Camping essentials for motorcyclists, Waterproof motorcycle luggage, Soft panniers, DIY pannier racks, Motorcycle camping gear, Camping equipment, Motorcycle travel, Moto-camping, Australian Motorcycle News, adventure biking, australian motorcyclist

Camping Equipment for the Road
I started riding motorcycles some 150,000 miles ago. From the outset, I found moto-camping to be the most economical means of traveling by motorcycling, as well as being one of the most enjoyable parts of the experience. Over the years I have honed my skills, learning what I need and what I don’t. I have found what works best for me and the kind of traveling I like to do. Everyone has a different way of approaching moto-camping, so my way may not be for everyone, but I’ve found I lack little of what I need, while not carrying more than necessary. While I might add a few spare parts to the bottom of my panniers that might be difficult to find outside North America, what I carry now for long distance rides is pretty much the same as I’d take on a round the world journey
So, here goes; this is my setup on my Tiger 800XCa, a mid-sized adventure bike. I hope someone finds this useful when they are planning their moto-camping excursion.
I built my own pannier racks and rear rack out of ½” steel, which has held up well. I’ve made these for two other bikes, including the one in a crash with a deer, where the bike hit the pavement at 45 mph and skidded a long way before coming to rest. The racks were undamaged in the wreck, so they are plenty strong, and I like the idea of the tubing being slightly smaller in diameter than commercial sets. In a really bad crash, I’d rather have the rack bend, instead of the bike’s frame.
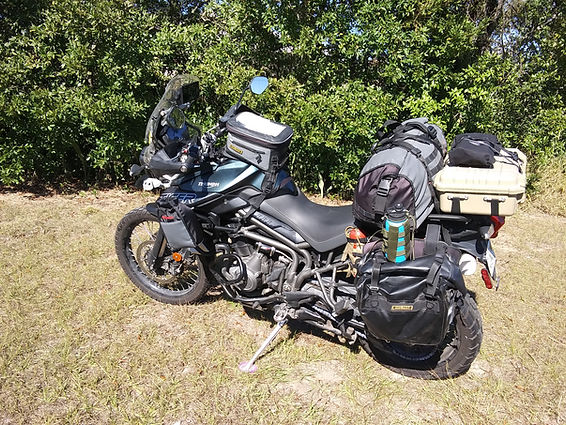
The Tiger loaded for a long trip.
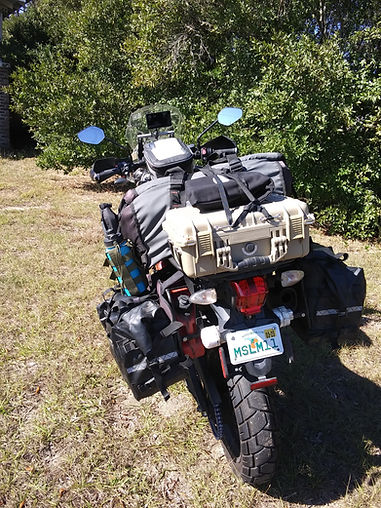
You can see the white tool tube tucked behind the license plate.
I favor soft panniers, both for safety and for convenience. If you ride a whilte eventually you’re going to drop your bike, and sooner o r later you’ll find your leg under it; I know I have more than once. With soft bags coming down on your leg you are less likely to sustain serious injury as a result. I can also easily take these off my Tiger and throw them over my 1978 Suzuki GS550 instead. I had Ortlieb quick release (QRL) bags before these Nelson-Rigg Hurricane waterproof panniers. The Ortliebs were damaged when I struck the deer on the Blue Ridge Parkway. When I went to replace them, Touratech had become their exclusive distributor and no longer offered the QRLs. The quick release was the main advantage of the Ortliebs over the Nelson-Rigg, the N-Rs were much less expensive, and I had a friend who had used the N-Rs on a TAT ride with success, so I went with those. N-R has improved them since this set, and now they have molle webbing, which is a handy way to attach stuff to the outside of the bags. Both the Ortliebs and the N-Rs are tough and do their job of keeping everything inside dry. The N-Rs also come with removeable inner liner bags, which are handy.
In one of the panniers I store spare oil, a small can of chain lube, and a homemade compressor, all in the very bottom of the bag to keep weight low. In the other at the bottom I keep the tool roll, and against the back side of the bag, vertically, I keep an atlas/maps.
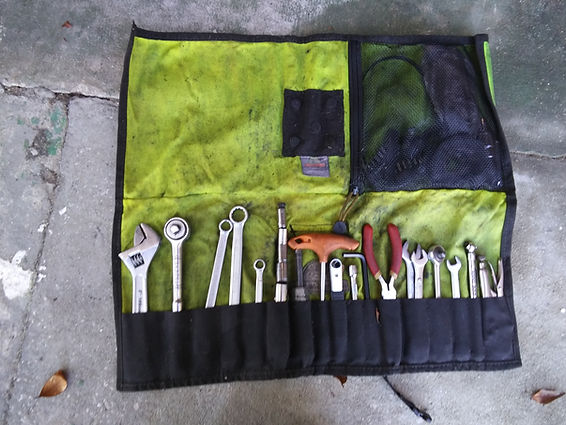
My tool roll, heavy but important to have
Above these, in one pannier, I keep a bag filled with all my regular day-to-day clothes, which typically includes: 2 jeans, 4 short-sleeve T-shirts, 1 long-sleeve shirt, 5 pairs of underwear. In the other I keep a toiletry bag and cold weather clothes including: 1 extra pair of wool socks, 1 set of thermal long underwear, 1 heavy sweatshirt, fleece neck gaiter, 1 pair shorts/swim trunk, towel/washcloth. I find these clothes cover me under almost all circumstances. I’ve ridden in the Upper Peninsula of Michigan in October in 40 degree weather and from Florida to the Pacific Northwest carrying only these clothes and never had an issue. Of course, I also have a good quality Aerostich Darien riding suit (waterproof), and one set of clothes I wear under that, in addition to what I’ve listed above.
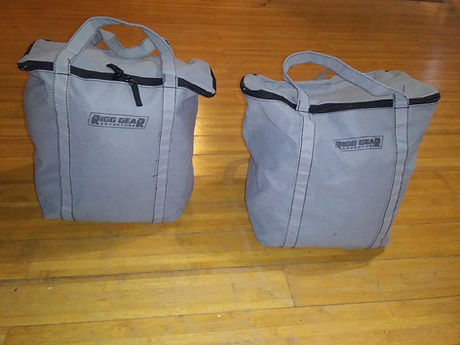
Nelson-Rigg pannier liner bags
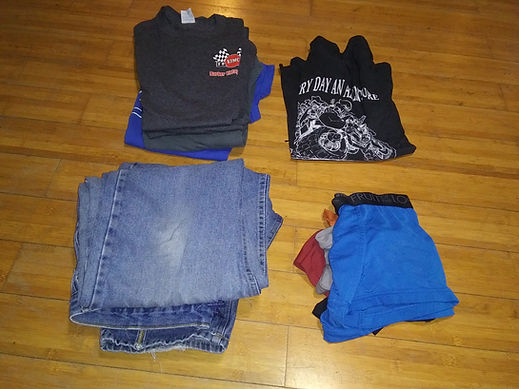
Everyday clothes in one
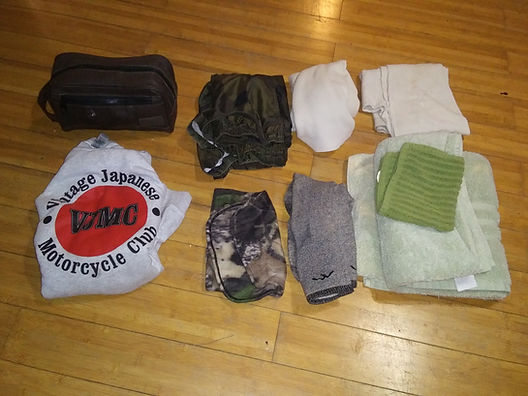
Cold weather clothes and toiletries in the other
If I was to purchase panniers again, however, I would choose neither the N-Rs or the Ortliebs. I’d buy the “Hippo Hips” from Turkana Gear instead. I like that the Turkana Gear has a tough, abrasion-resistant outer bag with a separate waterproof drybag on the inside. If you go down and abrade or puncture the bag, the chances of the inner bag also being damaged is less likely, and if it is, it can be replaced separately. This gear also utilizes molle. I was not aware of the Hippo Hips when I bought my panniers, but they are a good value, under $500 for both outer bags, two inner bags, two bottle holders and two “Bush Baby” bags along with dry bags for their interior, both of which can be attached via the molle to the panniers.
Speaking of Turkana Gear, I have their “Duffalo” forty-liter dry bag, seen in the photos strapped across the pillion seat with two Rok-Straps securing it. This is built the same way as the panniers, with a tough outer bag and a separate dry bag inside it. The dry bag is white, which makes seeing the contents of the bag easier, and velcroes to the outer bag opening. The bag is big enough to hold all my camping gear: tent and fly (inside a compression bag), footprint, tent poles and stakes, insulated sleeping pad, sleeping bag (inside a compression bag), sleeping bag liner, tarp, small electric lantern, camp chair, and rolled up towel (used as a pillow). It is convenient to have one bag with everything needed to set up camp in it (I may change that, which I’ll explain in a bit). Also, attached to the molle on one end of the bag I keep a two-liter water bottle—absolutely essential, especially if riding in the Southwest in the summer.
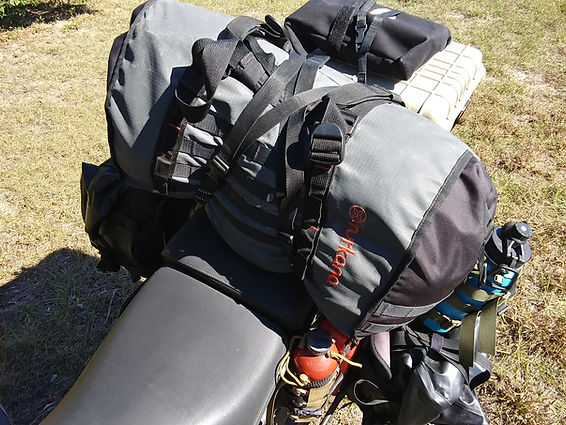
Turkana “Duffalo” 40 liter dry bag. Motowinch on tail box; goes in Duffalo.
The camping gear I have in the Duffalo includes: Ascent Hoodoo 20 degree F synthetic-filled sleeping bag. a light bag liner, a Thermarest Trail Lite pad, REI Groundbreaker II two-man tent, tent poles and pegs, footprint for tent (I recommend buying the footprint made for your tent; it makes setting up so much easier than trying to use a tarp or Tyvec), Harbor Freight pop-up lantern, rolled up towel for pillow, and a Helinox-tyle camp chair. Of all that, the chair has been the least useful. Almost all the campgrounds I’ve stayed in have had picnic tables to sit on, even in National Forest Campgrounds ( I traveled 11,000 miles mostly camping from Florida to Washington state and never used my chair), so unless you are going to be wild, dispersed camping, the chair might be something you can leave at home. I’ve found the sleeping bag/liner combo handy and versatile. In hot weather I just lay on top of the liner on the pad, if a little cooler I’ll just sleep inside the liner, cooler yet and I’ll sleep in the liner and unzip the bag and lay it over me like a blanket. If it gets colder yet, I zip up the bag and get inside, and if even colder I’ll sleep inside the liner inside the bag and perhaps in my base layer as well. I’ve slept in lower 30s temps and have been comfortable.
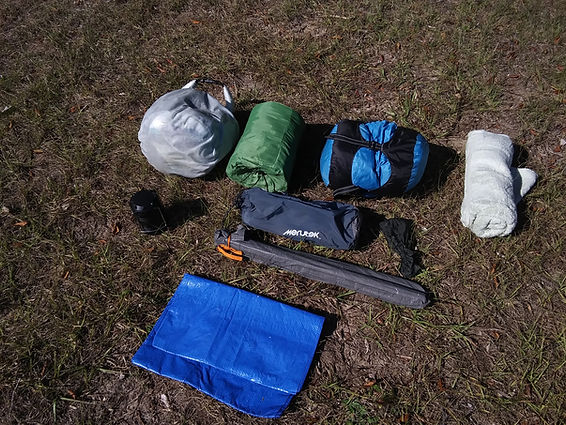
Everythng I need to set up camp. Top, L to R: sleeping bag and liner in compression bag, sleeping pad, tent in compression bag, towel “pillow.” Below, Top to Bottom: camp chair (tent pegs in small black bag), poles, tarp. Left: pop-up lantern.
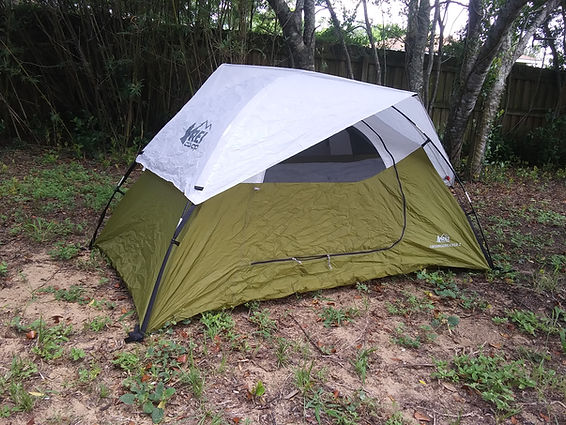
The REI Groundbreaker II tent. I’ve used this for three years now, and it is still is holding up well. Each year I spray the outside with silicone. It would be nice if it had a vestibule, but for onder $100 with footprint, it is hard to beat. It does require the footprint, though, as it does not have a “bathtub” bottom. I’ve just learned they’ve discontinued this tent but am sure something similar will come to replace it. It packs very small (in blue bag along with fly and footprint in photo above). I don’t fold it, but stuff it into its bag, then throw that bag in a compression bag with the footprint and compress it all down to what you see above. If you are solo riding, always buy at least a two-man tent. That gives you room for your stufff inside as well as your sleeping bag. I throw the empty Duffalo in along one side with my riding suit, tank bag. and boots, and I have plenty of room left for my bag.
On the rear rack, I have an inexpensive Harbor Freight “Apache 3800” dry box. I keep everything I need for cooking in it (other than the stove, which will always make food smell and taste like gasoline if stored with it). In the dry box I have a set of aluminum stackable pots and dishes and a spoon, a Stanley French press (inside of which I store my coffee in a small jar), and I still have plenty of space to store oatmeal and bags of dehydrated meals, along with snacks. I riveted strap eyes to the box, so I can attach straps to hold other things in place on the box and hold the box to the rack beneath it. I usually strap a pair of light and quick drying camp shoes to the top of the box (not shown in the photo).
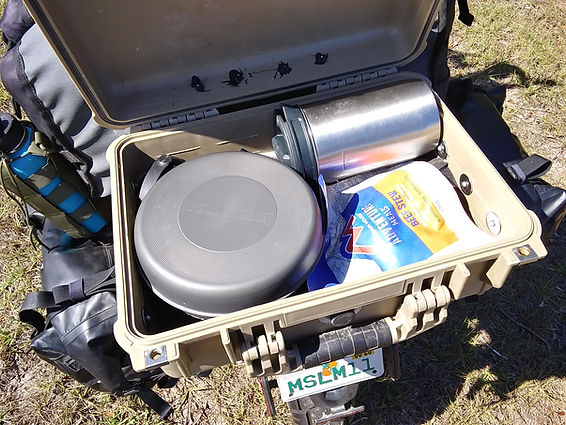
Tail box cooking stuff and food storage
On the tank, I use a Nelson-Rigg Hurricane Adventure waterproof tank bag with a clear top map pocket. I keep anything I need handy as I ride in this. Packed inside is usually a camera, a small dry box with cables and chargers, the case for the GPS, inside of which is a battery pack and cord, and all the little things I may want during the day, such as a hat, sunglasses, granola bar, etc. It has outside zippered pockets, in one of which I keep a kickstand “puck” for use when the ground where I park is soft and the kickstand may dig in. The Adventure-size bag is a bit big if you are standing on the pegs and makes it a little more awkward to get up over the tank, so if you plan to do more offroad than I do, you may want to get a smaller dualsport/enduro bag instead.
On the upper crash bars I’ve added Bush Baby bags. One one side the bag holds a small first aid kit in its own waterproof dry bag (I’m having a red cross patch sewn on it so it will be instantly recognizable in case of emergency), and on the other side I keep my water filtration kit (Sawyer).
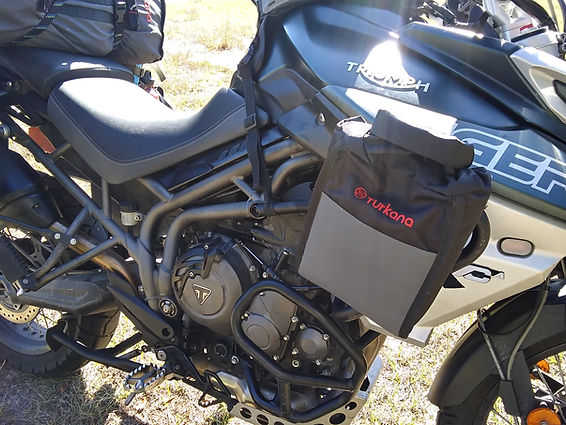
Turkana “Bush Baby” bags, one on each side
I built a small tube that mounts above the instrument and behind the windscreen to hold my Garmin XT GPS. It only limits my raising the windscreen to its highest position, but for me, I rarely need the screen even above the lowest height. This makes the GPS easy to see, right in front of me, close to the other instruments, instead of out on the left handlebar where it use to be.
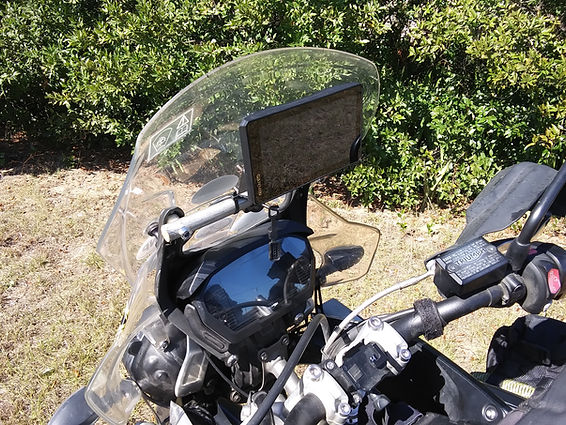
Homemade GPS mount for a Garmin XT
While building the pannier racks, I added a couple things. First, I built the racks so they are symmetrical. With the exhaust on one side, it fits just behind the rack, but on the other there was ample space to store something behind the rack. I like to have extra fuel when I travel long-distance, so I welded a flat bar across the pannier “loop” to which I attached a Rotopax one-gallon fuel container. This has come in handy before when I found myself in the boondocks and did not have the range to make it to the next gas station. It doubles as emergency fuel to help other similarly stranded riders I may come across. (I’ve used it in both scenarios.) I also use plain unleaded gas for my stove. I keep a one-liter MSR bottle for the stove attached to the front of the left pannier, but if I ever run low, all I have to do is pour more in from the Rotopax.
I also built a tube out of off-the-shelf PVC parts and suspended it under the tail above the rear tire. In it I keep tire irons, wrapped in a rag to keep them from rattling around inside. There is plenty of room for the wheel to move up and down its full range without bumping the tool tube.

The Rotopax attaches behind the left pannier rack and holds one gallon
The other thing you can see in the photos is an Eastbound “Motowinch” on the top of the tail box, but which I will normally store in the Duffalo for quick access, should I need it after dropping the bike.
I might mention here, before listing all the gear and weights, that there are still two things I want to do to modify this bike. First, I will replace the OEM handguards with Barkbusters. The stock handguards are really no more than wind protection and are made only of plastic with no metal backbone. The other thing I plan to change is the mirrors, which will be replaced with Double-Take Adventure mirrors, which are much more durable and foldable for when off-pavement and not needed.
Here’s a list of the equipment and what it weighs:
Pannier racks (approx.), 6 lbs
Panniers, empty, 7.5 lbs
Camping gear in Duffalo, 17.75 lbs
MSR Dragonfly stove, 1.5 lbs
Tailbox, full, 10 lbs
Motowinch, 3.75 lbs
RRR Tool Solutions tool roll, 7 lbs
Tire patch kit, .5 lbs
Chain lube, .25 lbs
Homemade 12 volt compressor, 2 lbs
Extra quart oil, 2 lbs
Turkana Bush Baby bags, empty, (each) .5 lb
First aid kit in dry bag, .75 lbs
Water filtration kit, .25 lbs
Tank bag filled (approx.), 5.5 lbs
Tool tube with tire irons (two sets: aluminum Bead Breaker Pro and small steel set), 2.5 lbs
One gallon Rotopax fuel container, empty, 2.3 lbs
One gallon gas, 1.63 lbs
Rotopax mount (approx), 2.2 lbs
Pannier liner bag with clothes, 6.5 lbs
Pannier liner bag with cold weather clothes and toiletry bag, 7 lbs
Camp shoes (approx.), 1 lb
All that gear adds up to about 95 lbs
As I mentioned earlier, my plans may have changed for packing, now that I’ve calculated all the weights. It’s always a good idea, especially with our typically top-heavy adventure bikes, to keep the weight as low as possible as you load the bike. I noticed I had close to eighteen pounds in the Duffalo behind me on top of the rear seat. I’ll probably move the clothes into the Duffalo instead, getting its weight down to a little over thirteen pounds, and move the camping gear into the panniers instead. That will still keep clothing separate from camping gear, while lowering the center of gravity of the bike. I’ll also probably leave behind the chair and keep the Motowinch in its place in the Duffalo.
Overall, I’ve kept the weight down to less than a very light passenger with no luggage at all and still have all the gear I need for a long ride. I’ve used this setup over thirty-four days on the road and in both hot and cold weather and never found myself wishing I had something I didn’t have or more room.
MORE = https://www.roaddogpub.com/single-post/camping-equipment-for-the-road